


Basketball exercises for seniors
Requirements:
- players must be able to individually defend the man with the ball
- players must be able to dribble
Goal: defender must force the dribbler to the side of the field. Dribbler must never penetrate over the defender's front foot and through the middle
Organization:
- choose a line on the field and demarcate the lane with it
- the dribbler must reach the baseline within 5 seconds
- the waiting player counts down aloud
- every time the attacker dribbles over the chosen line, he has a point (waiting player will judge doubtful cases)
- the attacker then dribbles back to the touchline at the same height and lets the defender take his position. The players continue the game, the time runs on
- defender pushes up 5 times for each point
- Attacker becomes defender, waiting player starts dribbling
Teaching Points:
- front hand points to the ball
- at the start of the dribble, the front foot of the defender should be next to the attacker to prevent him from coming directly over the front foot.
- Encourage the attacker to try this every time
- defender should keep an appropriate distance, taking into account the dexterity and speed of the dribbler
- defender should take a slide-step towards the half way line and towards the by-line to prevent the attacker from penetrating over the front foot.
Variations
- start with restrictions for the dribbler: compulsory dribbling with the weak hand; other hand on the back etc.
- as the defenders improve, remove these restrictions step by step
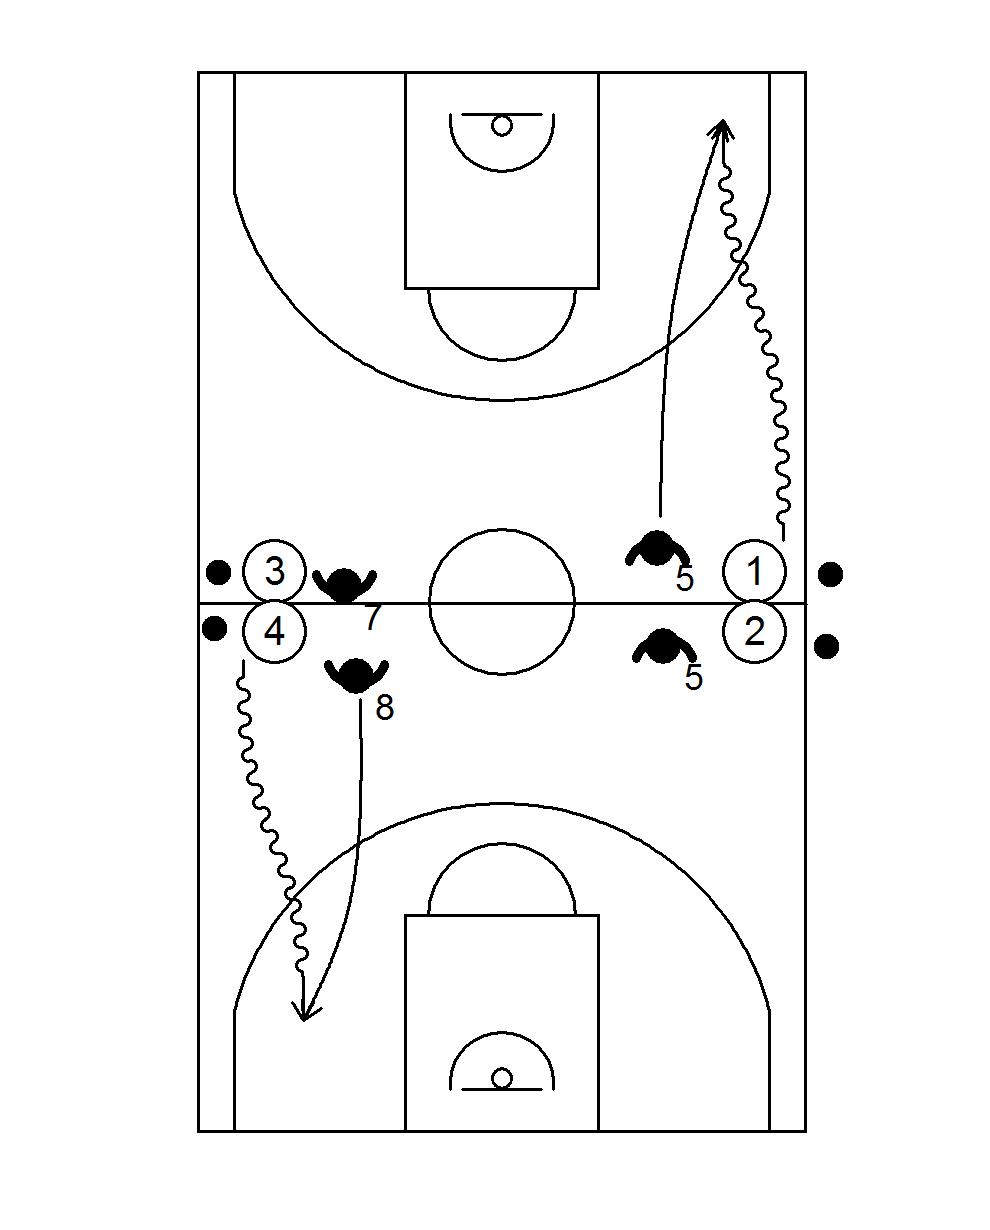
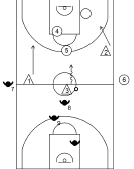
Game shape:
- helper starts on the block
- and may only defend in the marked block
- attacker has 8 seconds to score (the helper counts down)
- if attacker 1 manages to pass defender 3 over his front foot, he can score through the bucket, without the helper being able to do anything
- if defenders 2 and 3 are only allowed to help in the marked area
- at a score the attacker keeps the ball
- at a stop, the players move up one position
Requirements:
- players must be able to individually defend the man with the ball
- Players must be able to dribble
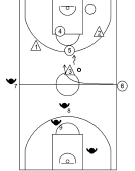
Goal: defender forces the dribbler to the side of the field and reduces the distance so that the dribbler grabs the ball.
Organization:
- choose a line on the field and demarcate the lane with it
- the defender has to keep the attacker inside the lane
- the dribbler has to be at the back line within 5 seconds
- the waiting player counts down aloud
- immediately after the start of the dribble, the second defender locks the dribbler in the back of the court
- as soon as the dribbler takes the ball, the defenders together cut off the passing lines towards the half way line
- and only passes they allow are parallel to the touchline
Teaching Points:
- first defender must aggressively close the gap
- AND close off the touchline
- second man starts as soon as the dribbler crosses the half way line
- trace the ball
- defenders always one hand low and one hand high (umbrella)
- attacker is never allowed to step or pass between the defenders
- avoid mistakes; conquer the ball by 1) 5 seconds, 2) bad pass, 3) attacker's foot on the line
Variations
- start with restrictions for the dribbler: mandatory dribbling with the weak hand; other hand on the back etc.
- as the defenders improve, remove these restrictions step by step
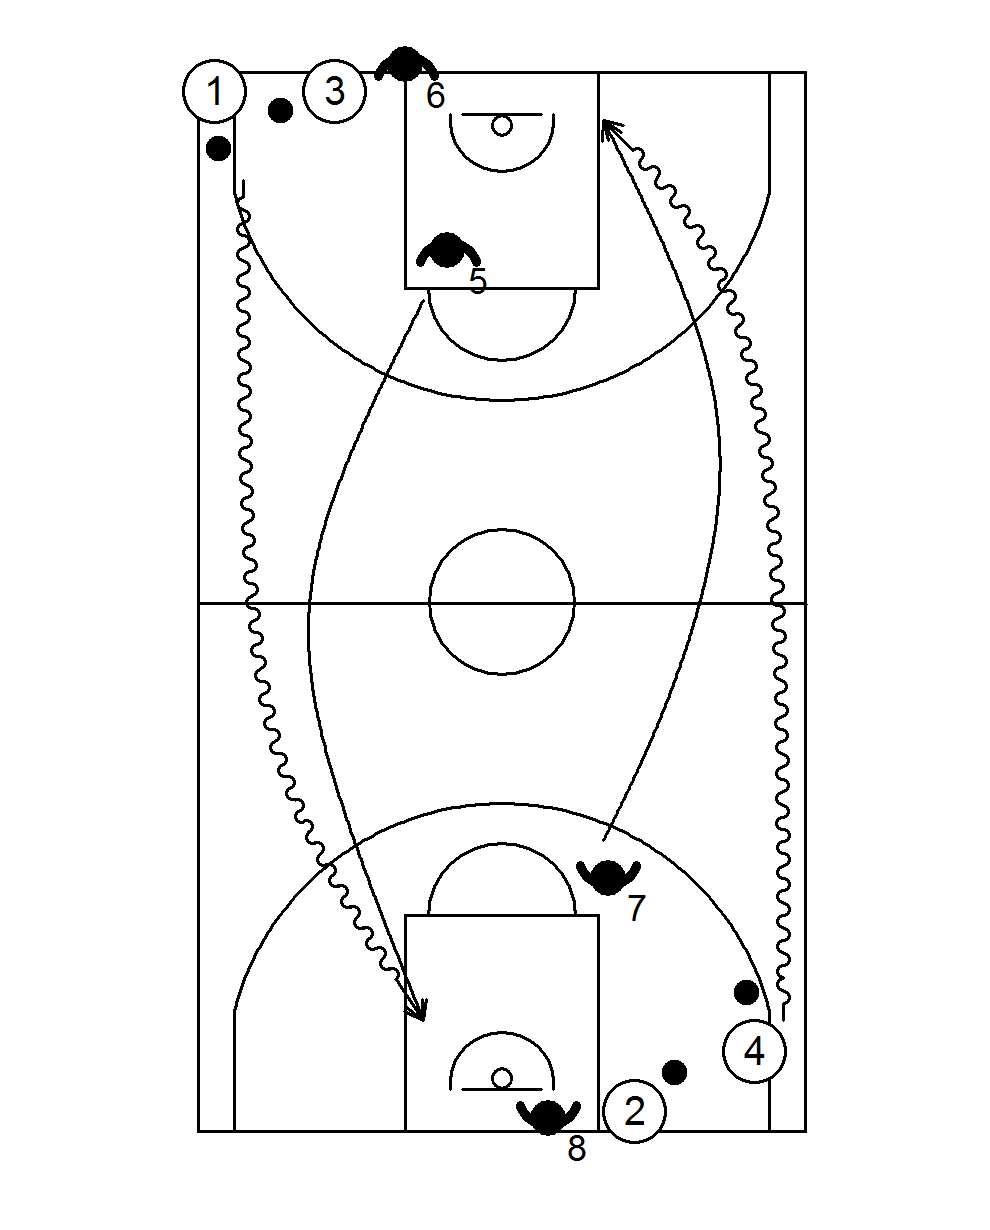
- 2 extra attackers and 2 extra defenders. After the dribbler has picked up the ball, the 2 extra attackers try to open up a passing line The defenders must intercept the pass
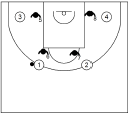
Requirements:
- players must be able to individually defend the man with the ball
- players must be able to dribble
- players must be able to outbox
Goal1: Defender must force the dribbler to the side of the field. Dribbler may never penetrate over the defender's front foot and through the middle.
Goal2: boxing out after the shot
Organization:
- 1 against 1 across the longitudinal half
- Loser must defend in the next round, takes the ball and stays on his own length half.
- attacker goes to the other longitudinal half
- defender must push 3 times in the centre circle if the attacker can make a lay up.
Teaching Points:
- defender must keep an adequate distance: do not allow penetration
- immediately after the shot, the defender seeks contact with the attacker
- back parallel to the baseline
- boom out with a front pivot or a reverse pivot
Requirements:
- players must be able to individually defend the man with the ball
- players must be able to dribble
Goal: defender must force the dribbler to the side of the field. Dribbler must never penetrate over the defender's front foot and through the middle
Organization:
- 1 against 1 across the longitudinal half
- Loser must defend in the next round
- defender must press down 3 times if the attacker comes between the defender and the helpline anyway
Teaching Points:
- defender must keep an appropriate distance, taking into account the dexterity and speed of the dribbler
- defender must keep a constant distance from the three-point line (i.e. when the attacker comes within shooting distance of the basket)
- as the skill of the defenders increases, reduce the distance to the attackers
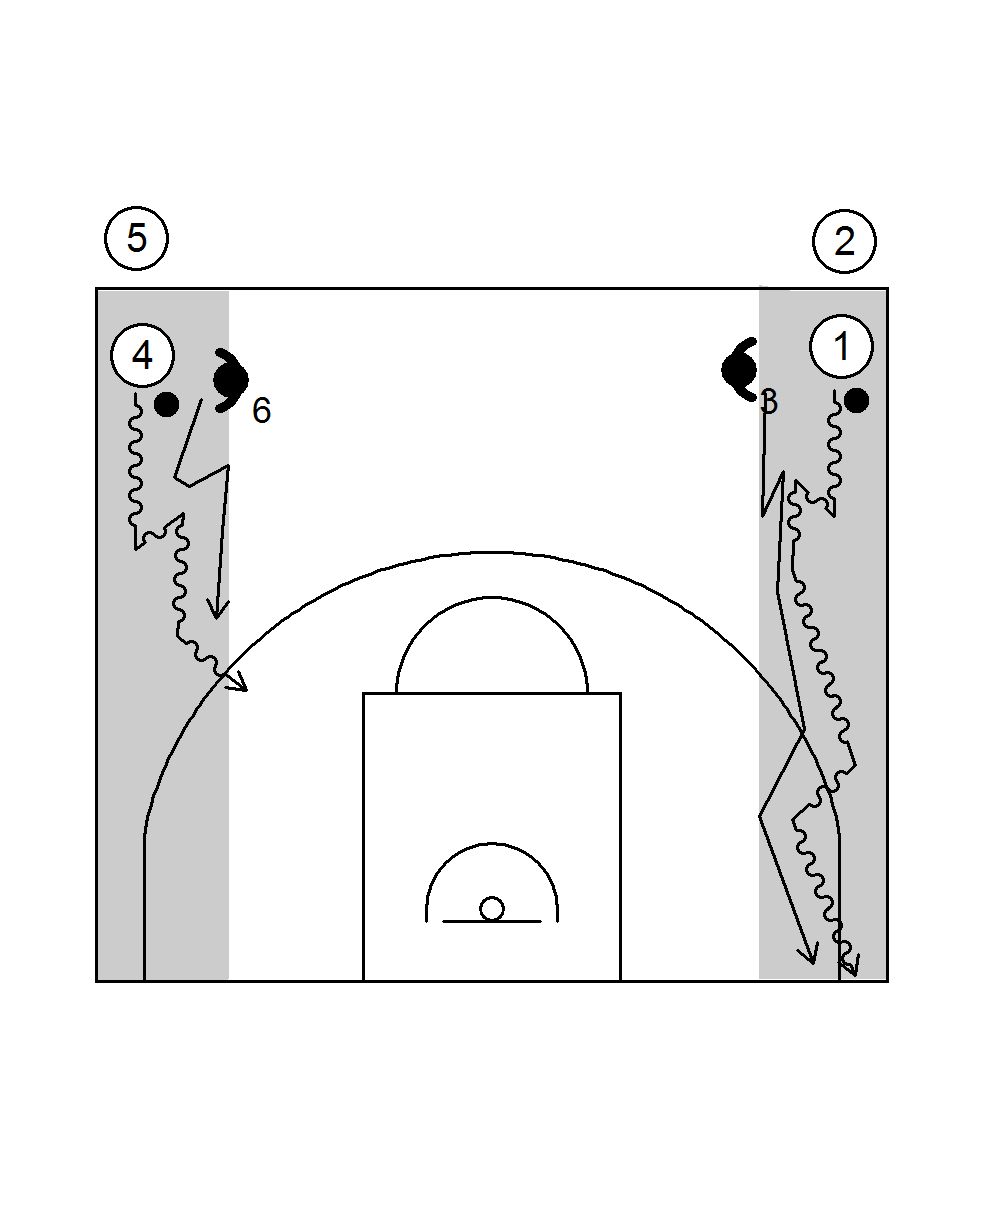
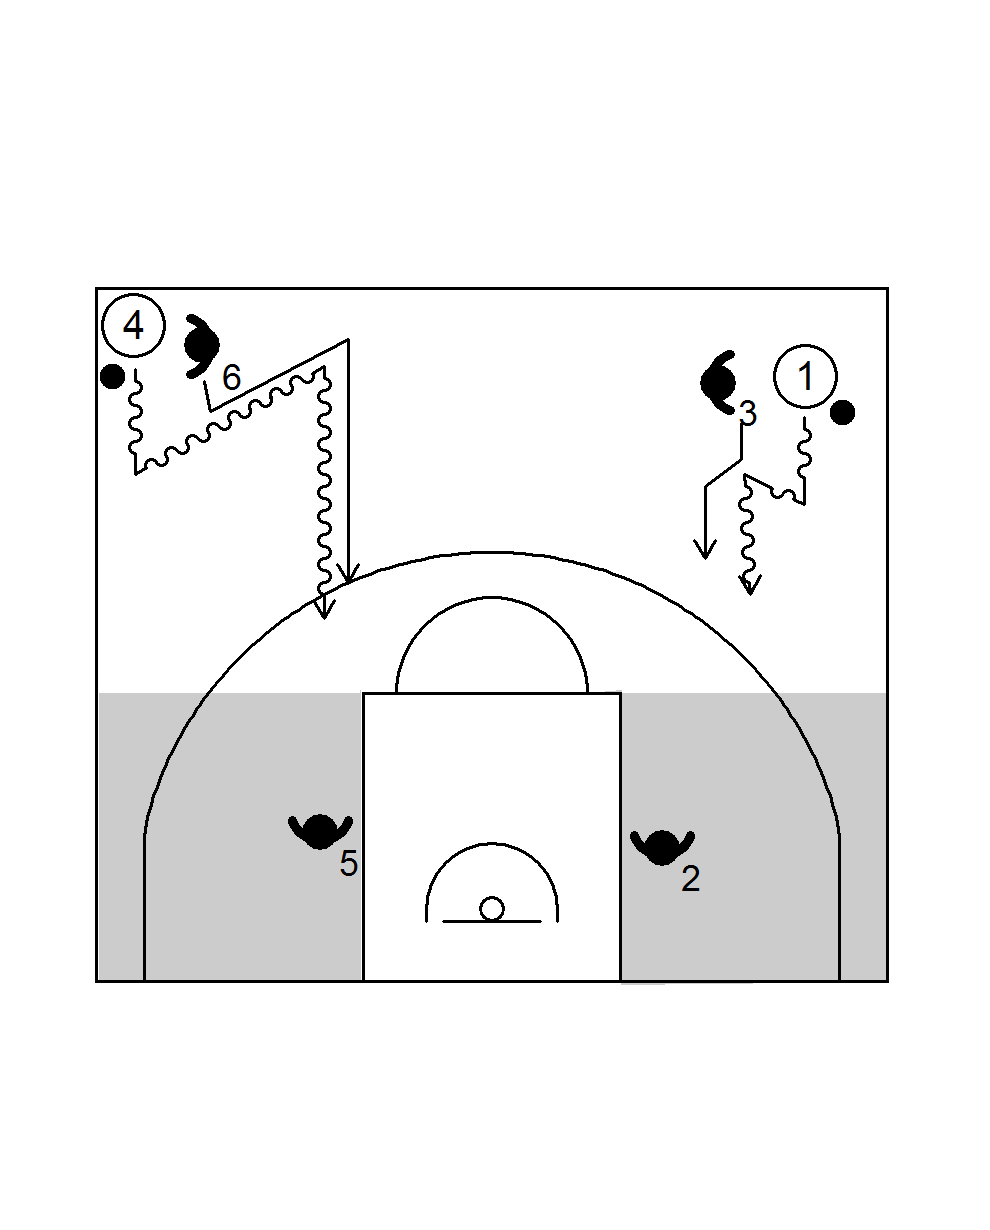
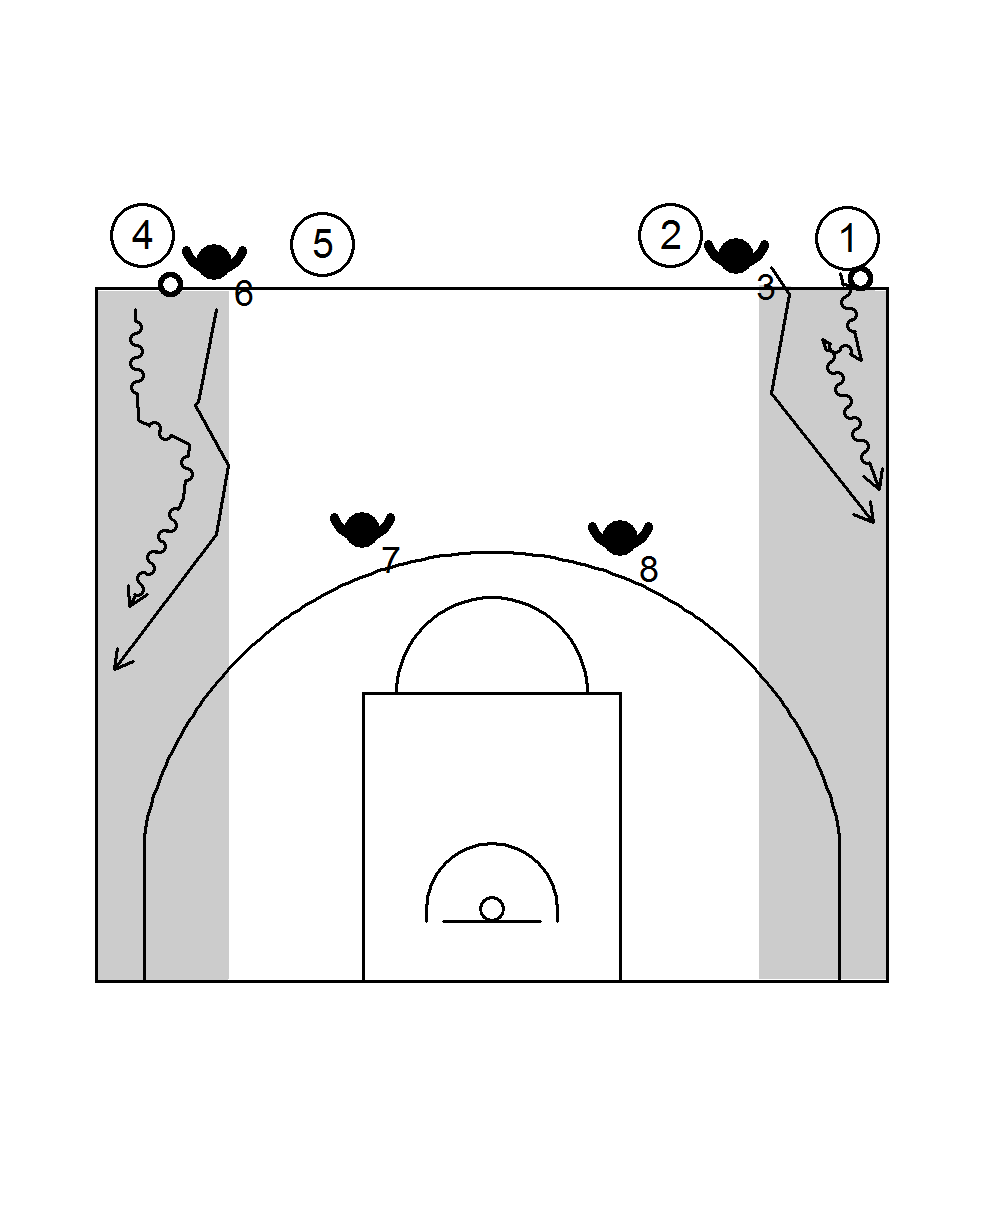
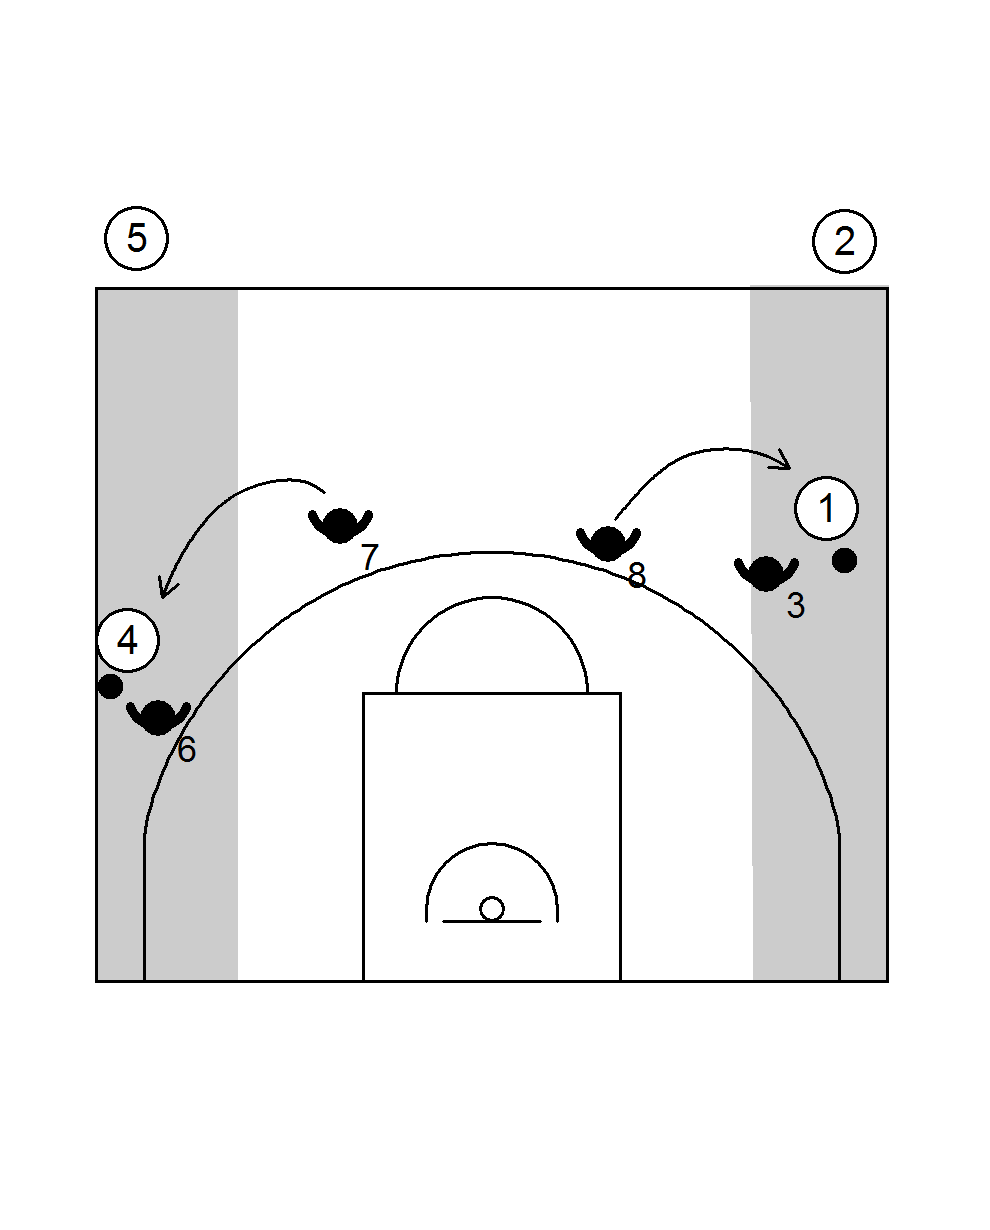
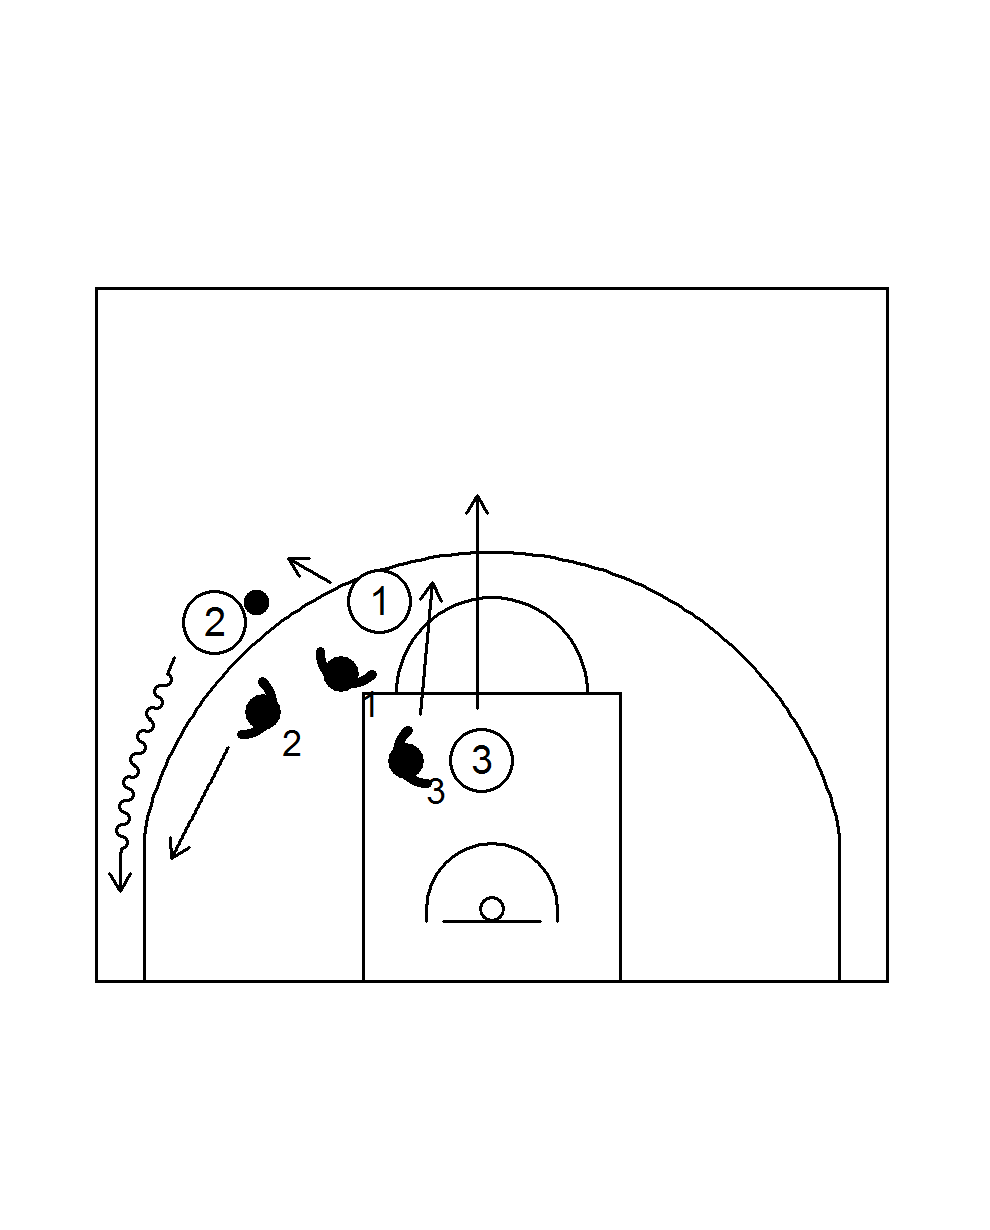
Goal: securing the dribbler against the sideline after stopping the dribble
Organisation:
- defender passes to attacker on signal of the coach
- Attacker is NOT allowed to dribble, only to pivot.
- the trainer counts down 5 seconds
Teaching Points:
- Get as close to the attacker as possible (but stay in your own cylinder).
- Move your feet closer to the attacker, but keep your position between the attacker and the helpline.
- If the attacker allows you to have his back, move your feet forward.
- trace the ball
- defenders always one hand low and one hand high (Umbrella)
- the attacker is never allowed to step or pass between the defenders (only passes parallel to the sideline are allowed)
- avoid mistakes; conquer ball by 1) 5 seconds, 2) bad pass, 3) attacker's foot on the line
Form of play:
Two additional attackers running free outside the lane. A successful pass between the defenders is a point for the attackers. 5 seconds or foot of the attacker on the line is a point for the defenders. Play to the 2.

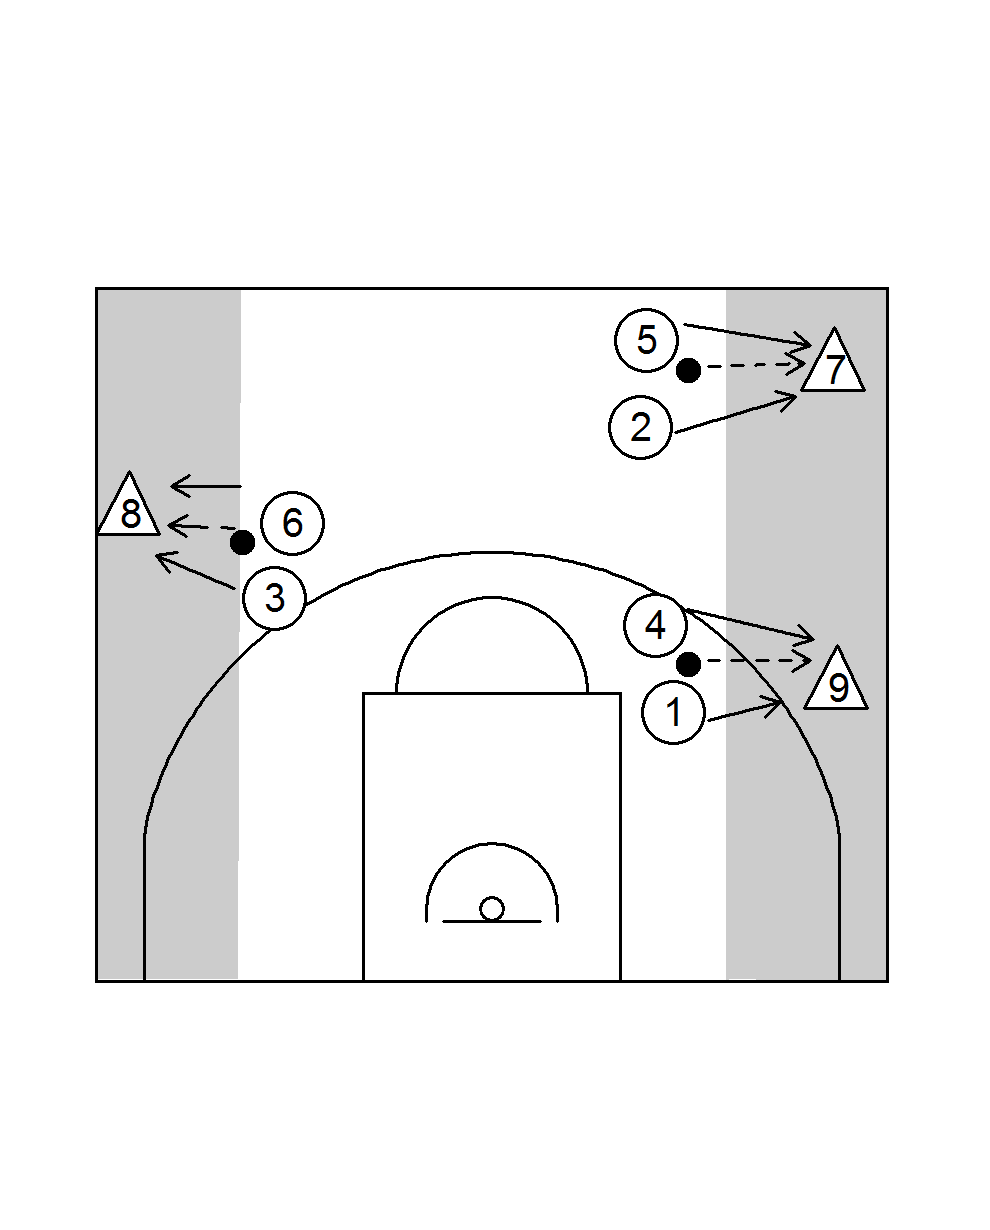
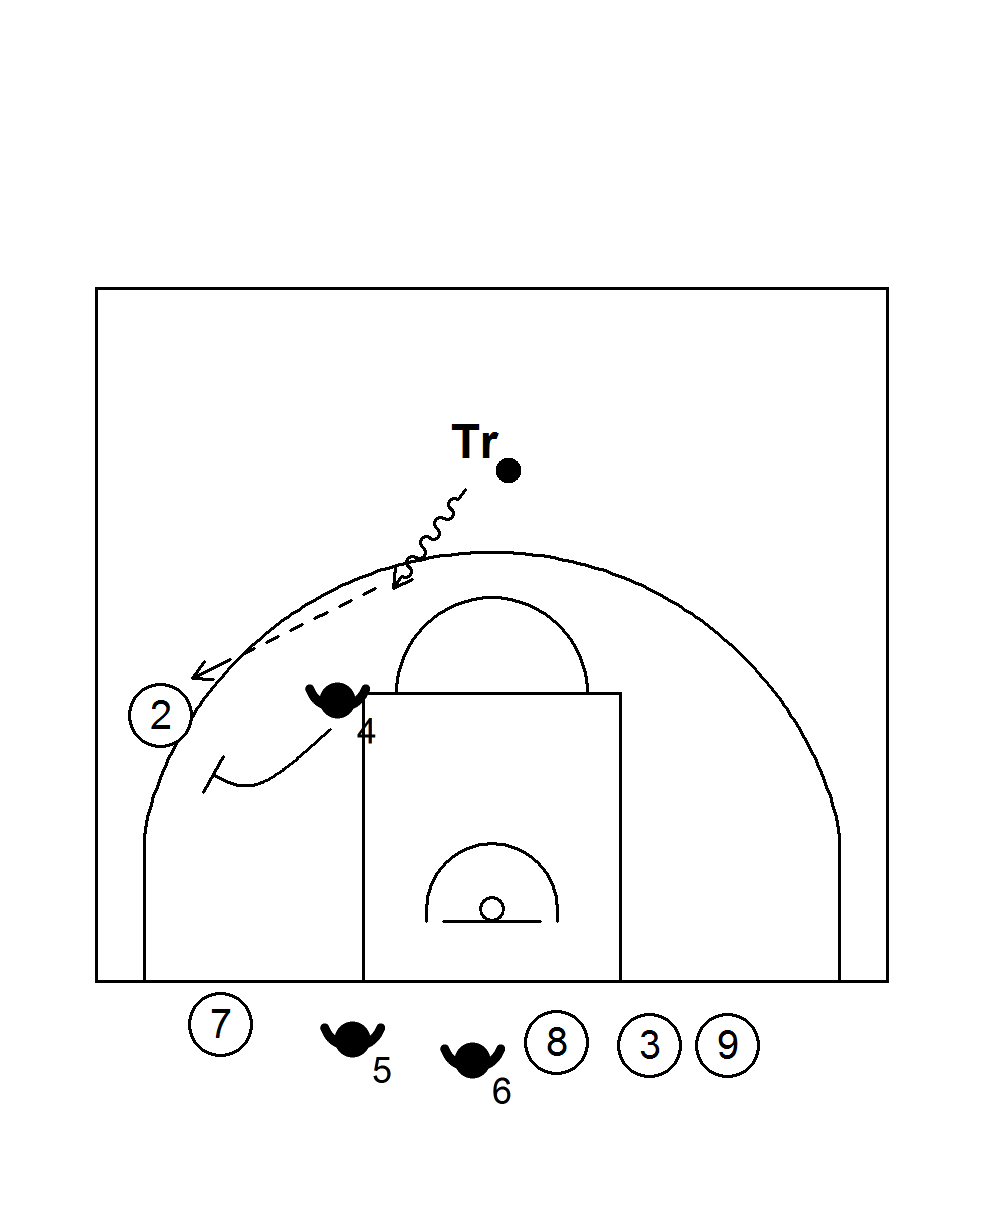
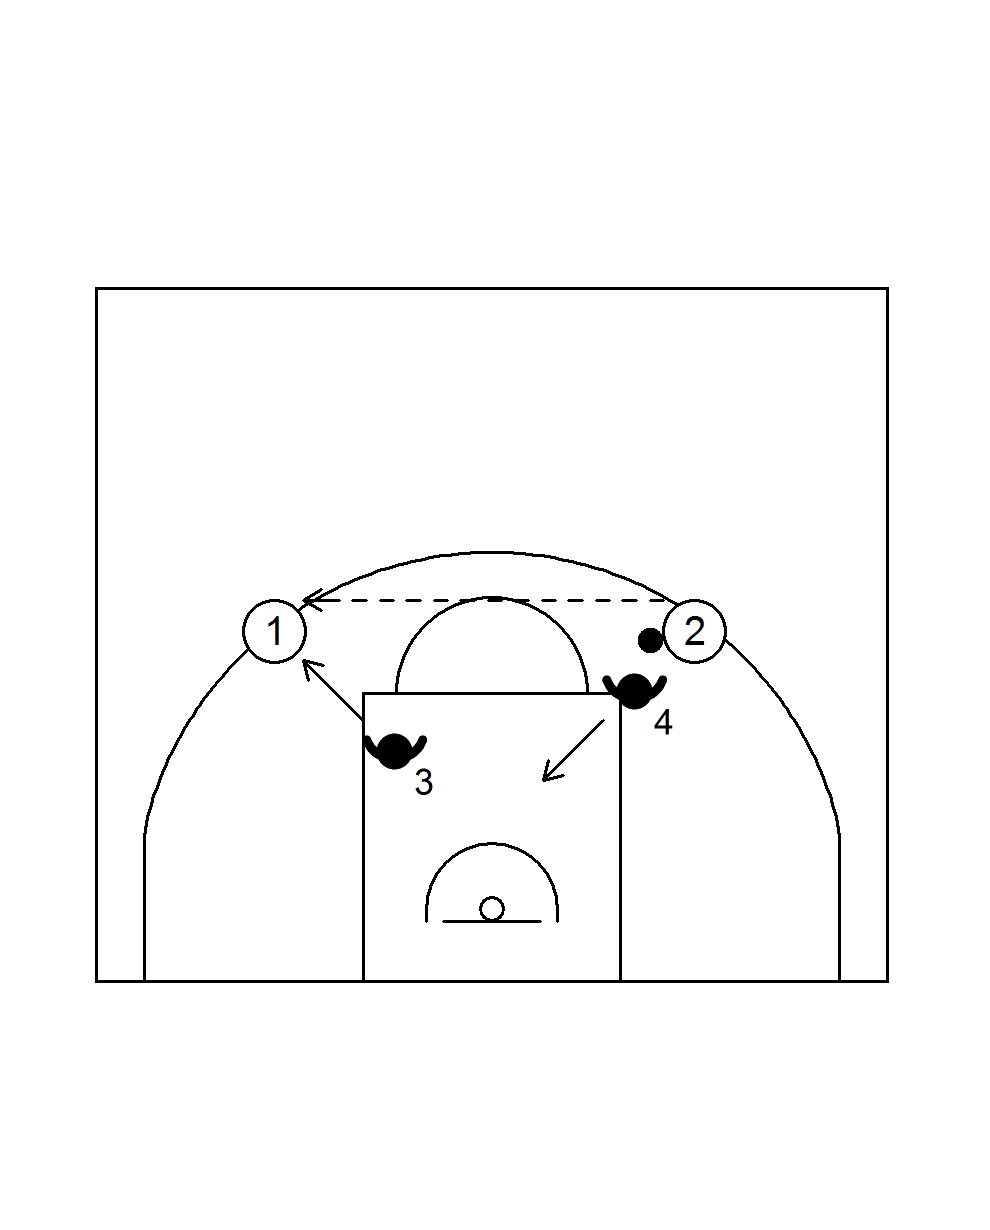
Goal: to defend one pass away
Organization:
- attackers use quarter of the field
- try to get free with in-out or cut
- first restore balance by occupying the 3 positions before cutting again
- defender overplays when his man is playable with one pass
- attacker can dribble
- a waiting player counts down 20 seconds
Teaching Points:
- hand in the passing line
- front foot in the passing line
- catch your man with your forearm
- 3/4 of your attention on the man, 1/4 on the ball
- NO help
- change after x stops
Form of play:
- each team gets 5x ball possession
- who makes the most stops
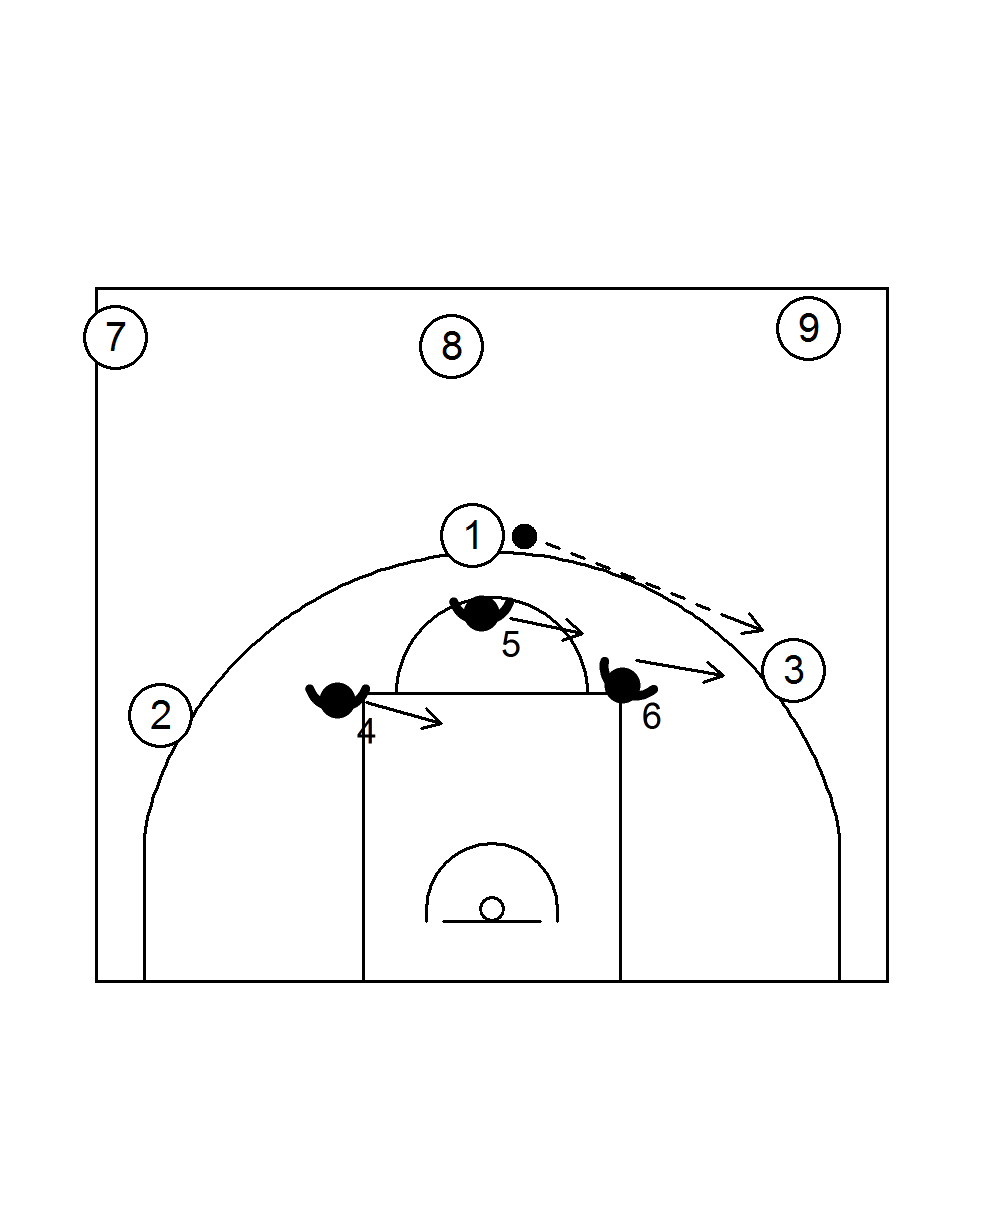
Requirements:
players must be able to play individually 1 against 1
Goal: train position of the defender to help prevent penetration (instead of passing over) + recovery
Preparation:
- the defender must first choose his position in such a way that he can help stop the penetration
- after matching the attacker, he takes up his position between the ball and the ring
- at the distance suited to the qualities of the attacker
- or at the distance requested by the coach
- the players play 1 against 1
- Attacker becomes defender.
- New attacker turns in
Organisation:
- the three defenders start in the bucket, with the ball
- defender 5 rolls the ball to 1 and defenders take up their positions
- attackers hold their position and pass the ball back and forth (also pass fakes!!)
- they may score with a drive or a dribble with jump shot
- a three-point is a point for the attack
- a two-point shot is a point for the offense, but
- if there is still a defender between the shooter and the basket at the moment of shooting, it is a point for the defense
- interception or defensive rebound is a point for the defense
- play until the 5, then change
Teaching Points:
- defenders have to take the right position immediately after the pass with an explosive step
- Anticipate the pass and take a slide step so that you can get to your defensive position earlier (in case of a pass fake, you have to take a slide step back quickly)
- one pass away = one metre from your man and one metre from the passing line, so that you can help with the penetration of the ball
- when the ball is 2 passes away, you have to stand with 2 feet in the bucket
- immediately after the shot, both defenders must look at their man instead of the ball and box out
Variations:
- offensive rebound is a point for the attack (if you want to emphasize boxing out)
- shallow cut from 1 after the pass + 2 rotates to the head
- shallow cut from 1 after the pass + 2 sets a screen for 1 under the elbow and then steps out to the guard position
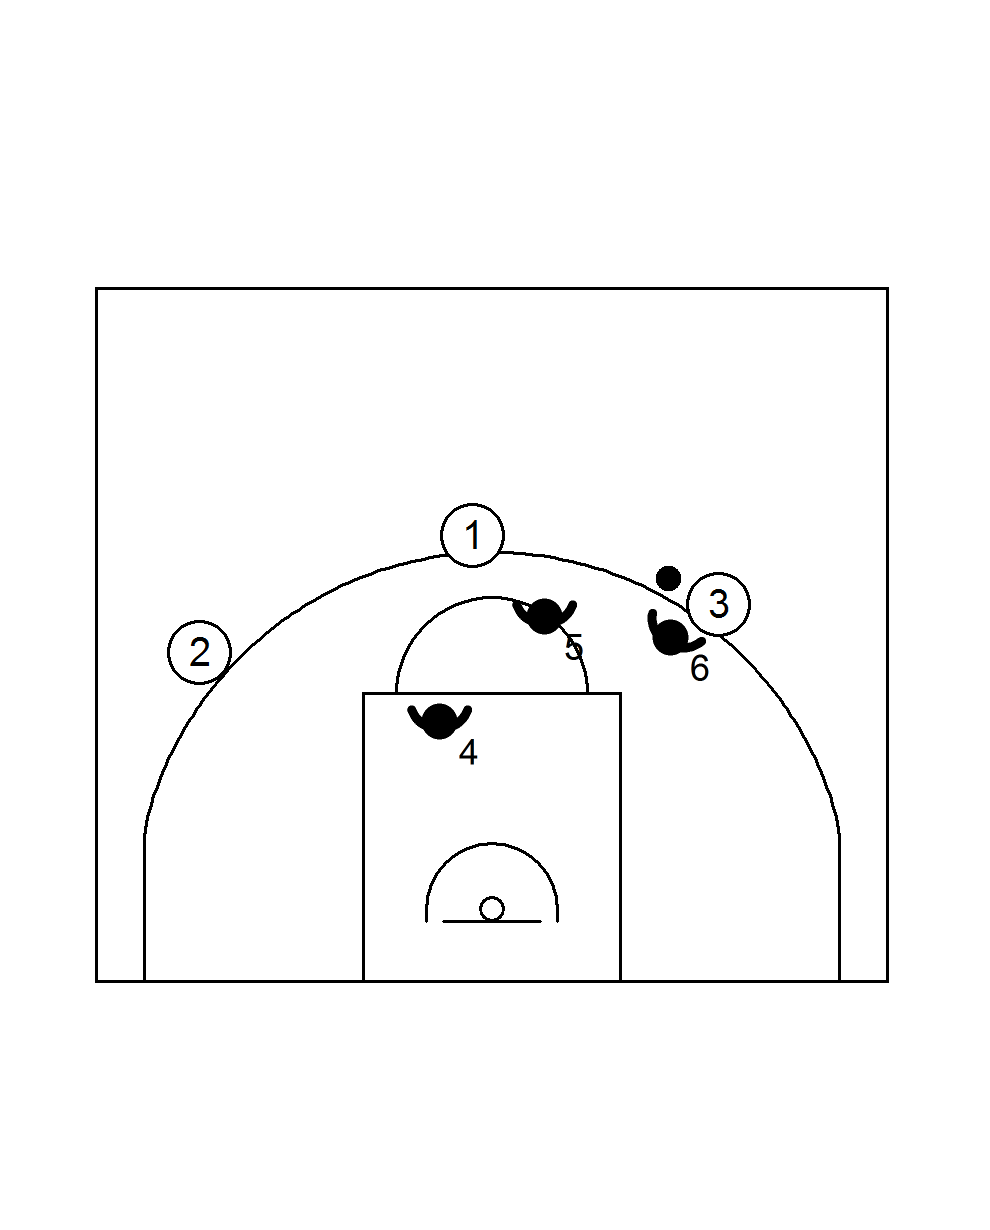
Requirements:
players must be able to play individually 1 against 1
Goal1: Improve the position change of the defender between helpside and ballside defense
Goal2: boxing out after the shot
Organisation:
- one of the defenders passes the ball from under the basket to an attacker
- A defender on the ball side closes the way to the basket (close out).
- the other defender takes the help side position: one foot in the bucket if the ball is above the free throw line; on the basket-basket line if the ball is below the free throw line
- When the ball is passed to the weak side, both defenders must quickly adjust their position relative to their man.
Substitutions:
- make it, take it
- or two is too much (push up defenders after 2 consecutive scores)
- (if you have more than 4 players, let the other players practice shooting at the other basket)
Teaching Points:
- Close out weak side shooter
- two explosive sprint steps, then lower your hips a bit + reduce step size
- inside foot in front
- outside hand in the shooter's face
- After the shot:
- immediately after the shot, both defenders must look at their man instead of the ball and box out
- put the forearm on the chest of the attacker
- box out with a front pivot or a reverse pivot and chase the ball
Variations:
- defenders may score from a rebound or interception
- the scoring team continues to attack
- play until the 7
Prerequisites:
players must be quite proficient and in good shape
Objective:
concentration and energy in defense
Organization:
- 4 against 4 on one basket
- new defenders when the defence has made 3 stops (i.e. the defenders gain possession of the ball).
- after a score or a foul on the shot, the defending team returns one stop
- The exercise lasts 12 minutes
- and if you do not defend well, you are defending for 12 minutes.
- if the attacks take too long, the trainer will count down loudly: 5-4-3-2-1-0
Teaching Points:
- After 2 stops the whole defense steps up their game. When they make the third stop, they can start attacking.
- As a side effect, the attackers learn in a playful way who will hit the balls when it gets exciting, and who will not.
When you have 12 men:
- rotate with 4 men
- After every stop, score or foul on the shot, a new team of attackers enters the field (trainer determines if it is a foul).
- the team that causes the third and last stop goes to defend
Variations:
- three defenders, four attackers
- make 2 or 3 consecutive stops before being allowed to change.
- (with shot clock) 35 seconds of defense without scoring and without a foul. At a stop, the clock stays on and the attackers can try again. If the attackers score, or grab an offensive rebound, or if the defense makes a foul, the clock goes back to 35 seconds.
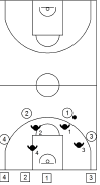
Prerequisites:
players must know how to apply help side and ball side defense
Goal: to learn each defense system
Organization:
- a team can get a point with a defensive stop, with a score from a fast break or with a three-pointer from the secundary break
- (stopping the break by capturing the ball counts as a defensive stop)
- winner is the team that earns the last point OR, if no one earns a point, the team that scores
- the winner may always go and defend
- new attackers enter the field
Teaching Points:
all aspects of team defense
Tips:
- defending the break is also part of this exercise. That is why the three-pointer from the secondary break is also a point. This forces all players to defend after losing the ball in the attack.
- If the break is not executed quickly, blow it off. This will improve the speed at which the players react.
Note: The illustration shows the situation after a score from a break. The defenders first made a stop and then scored from the (secundary) break. So, two points. They therefore continue to defend and new attackers have entered the field
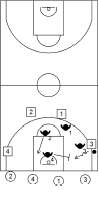
Prerequisites:
players must know what a double team is
Goal:
- to train double teaming
- dynamic organizing and reorganizing of the defense
- practice transition
Organization:
- 3 players attack along the length of the whole field
- 3 attackers start at the half way line
- 3 defenders per half
- of both defending teams one player takes up position near the half way line
- defender 6 waits near the halfway line
- can only start defending when the ball is in the attacking half
- must sprint with both feet through the centre circle before joining the defence
- from that moment on, two defenders must always try to double team the man with the ball
Rotation after scoring:
- the defender closest to the half way line immediately takes up his position next to the pitch
- attackers must take the ball from the back line
- the three remaining defenders try to prevent this (5 seconds)
- if that does not work, they have to try to trap the dribbler with a double team
- if the defenders capture the ball, they immediately attack the same basket again (like in a Full Court Press in a game)
- the fourth defender joins the defense (i.e. the other three) immediately after the turnover
Rotation after the turnover:
- the player with the ball in his hands hands hands it off to another player and takes up his position near the center line.
- the three remaining players attack the other basket
- the team that has lost the ball defends.
Teaching Points:
defenders always try to conquer the ball with a double team.
Variation:
can also be played 3 against 3 + 1 half court: after a score the attackers have to take the ball and get it over the half court 1
Prerequisites:
players must know what help side defense and what ball side defense is
Goal: train early help and quick recovery
Organisation:
- the three defenders stand facing the back line and take up their defensive positions as soon as the coach passes
- coach passes the ball to a random attacker
- the attackers have 10 seconds to score and the coach counts down aloud
- play until the 3 stops or a difference of 2 (stops scores), then change
- screens on the ball are not allowed
Teaching Points:
- defenders must move when the ball is in the air
- occupy the agreed-upon helper position
- stop the penetration when the man with the ball passes his defender
- anticipate the swing pass: take the first step towards your own man even before or as soon as the passer picks up the ball
- Communication as agreed within the team
Variations:
attackers are only allowed to score from the bucket.
Variation with more competition element:
- attacker with ball starts at 2 meter of the three-point-line; place to be determined by the team.
- must start with a dribble
- the defenders may turn around at the first dribble
- the attackers must make a goal attempt within 20 seconds - the waiting players count down
- you can only earn points in defense
- two stops in a row are one point
- if you score twice in a row, you may go on defense
- Losers turn out
- new attackers turn in
- play until the 3