Hockey exercises for u12
Aim
- Practicing some useful hockey techniques.
Set up
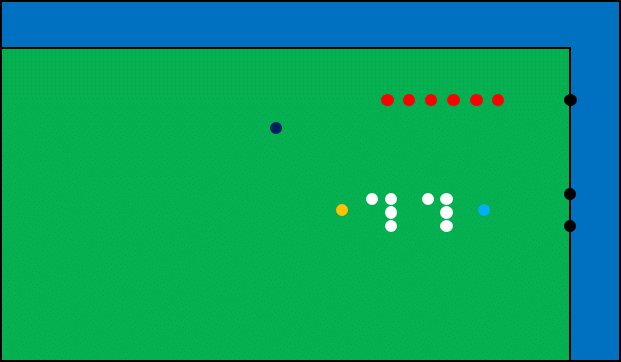
- The player starts at the top black pilon.
- He/she goes through the red slalom and then dribbles towards the (dark) blue pilon.
- From the (dark) blue pilon an Indian will follow
- Dribble to the yellow pilon.
- This is followed by passing moves, in this case a drag has been chosen.
- With other movements, the pilons may have to stand slightly different.
- But here the player runs to the left (end of the L) and drags in front of the 3 pilons the ball forcefully to the right.
- This is repeated again and then the player pushes the ball onto the black goal.
- This exercise can be made easier/complicated. E.g. by changing the passing movements, increasing/reducing the distance of dribbling, making the goal smaller/ larger, adjust the slalom slightly, etc. etc. You can really let your own imagination run wild.
- Player 1 asks the ball in front of the pilons and receives the ball from player 3.
- At that moment player 2 grabs a ball and dribbles to the back line.
- Player 1 runs with his/her ball to the circle and finishes there.
- Then player 1 runs to the penaltyspot where he/she receives the ball from player 3.
- The ball is then finished on goal again.
- It works just like a normal game only now there's a square in the middle.
- If a shot or other foul is made, or if the ball has been out of bounds, the trainer throws/plays in a new ball from inside the square.
- The ball does not necessarily go to the same team or at the place where the foul was made.
- The size of the field depends on the number of players.
- Player 1 plays the ball to player 2 after which player 1 runs through
- Player 2 bounces the ball back to Player 1,
- Player 1 aligns the ball between the pilons (The player is not going to run into the "pilon box".)
Player 1 then finishes the ball at goal
You can speed up this exercise by placing the mirrored exercise on the other side, allowing you to play from 2 sides.
Aim:
To become physically as well as technically warm as preparation for the training.
Set up:
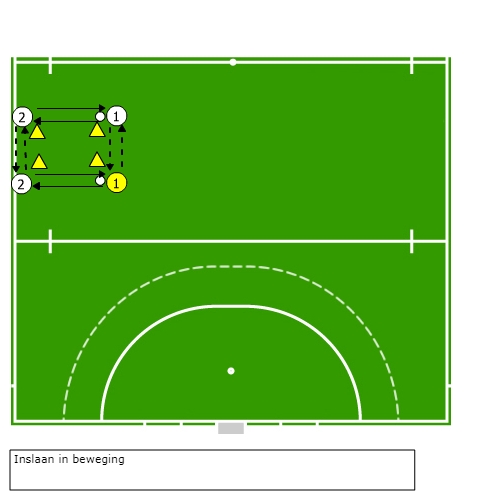
The exercise will be done with a maximum of 4 people. Of course you can put a multiple of these so that the exercise still works.
1. The players 1 start with the ball and play it to their players 2. Then they change positions.
2. Players 2 play the ball back to players 1 and also change positions.
Variations:
- You can vary the way of passing (hitting, push, flats)
- Increase the distance between the pilons that players only has to run further.
- Increase the distance between the pilons that players have to pass over longer distances
- Increase both distances.
- Increase speed.
- Make as many successful passes as possible in time.
Points of attention:
- Sit low for a good control.
- Stick to the ground at ball control.
- Play the ball on the forehand side.
- Stand still while performing a ball control.
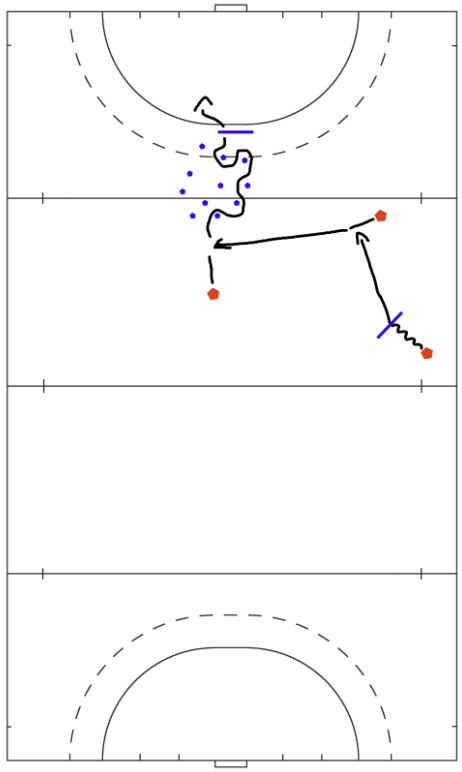
- Person 1 dribbles with the ball, does a 3D trick
- and passes a backhand to player 2 while running.
- Player 2 passes the ball to player 3 in the run.
- He dribbles along the obstacles and does a 3D trick at the end,
- Then player 3 hits the goal with a backhand shot.
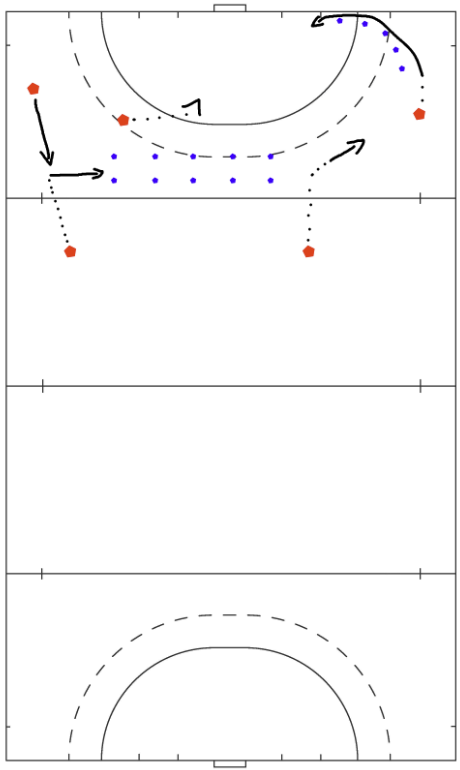
- Balls are at the first pilon.
- The player at the first pilon passes the ball to the second pilon,
- who pushes the ball through the pilons to the third person.
- The third person runs in on the ball and runs even further,
- then he pushes the ball to person 4 while he's running.
- Person 4 runs around the pilons and passes the ball at the top of the circle,
- where person 5 has just run up to finish the ball in the goal.
Aim:
Getting warm through a combination of passing, running and controlling the ball while running or standing still.
Set up:
This exercise also known in volleyball. The pilons are not quite in a triangle. It is possible, depending on the number of players, to set up multiples of the exercise.
1. The player at A plays the ball straight on to the player at B.
2. The player at B plays the ball to the player at C and runs towards point A.
3. The player at C receives the ball at point D and passes it to point A.
4. For the substitution A goes to B, B via D to C and C to A.

Variations:
- The stroke can be varied. (hitting, push, flats)
- The distances can be increased or decreased to adjust the level of difficulty.
- Pilons can be placed to play in between. This to increase the accuracy. When you make the pilons smaller, the difficulty increases.
- To play the ball from C to D, it can be bounced.
- To play the ball from D to A, it can be bounced.
- You can also place point C on the other side so that you turn backhand and forehand.
- When you place point C in 90 degrees from point B, you can rotate the same exercise only then from a different angle at point D.
- When you put down different situations, you can let the exercise rotate. Situation A is the standard, with situation B the exercise is mirrored, with situation C the exercise is set up in such a way that point B and C are at 90 degrees from each other and situation D is a mirror of situation C.
Points of attention:
- As a trainer you can take a good look at the different techniques of your players.
- Sit low when controlling the ball
- When playing the ball from C to D, the ball must not pass too far in the direction of A. The aim is for the player coming from B to take the ball at right angles.
- Play where possible on the forehand.
- Stand ready to control the ball. (low to the ground, stick on the ground)
Aim:
- To become physically as well as technically warm as preparation for the training.
Design:
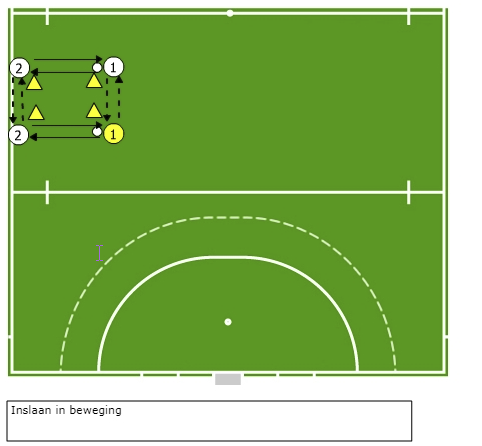
- The exercise will be done with a maximum of 4 people.
- Of course you can put a multiple of these so that the exercise still works.
- The players 1 start with the ball and play it to their players 2. Then they change positions.
- Players 2 play the ball back to players 1 and also change positions.
Variations:
- You can vary the way of passing (hitting, push, flats)
- Increase the distance between the pilons so that one only has to walk further.
- Increase the distance between the pilons so that one only has to move on.
- Increase both distances.
- Increase speed
- Make as many successful passes as possible in time.
Points of attention:
- Sit low for good control.
- Stick to the ground at ball control.
- Play ball on the forehand side.
- Stand still at ball acceptance.
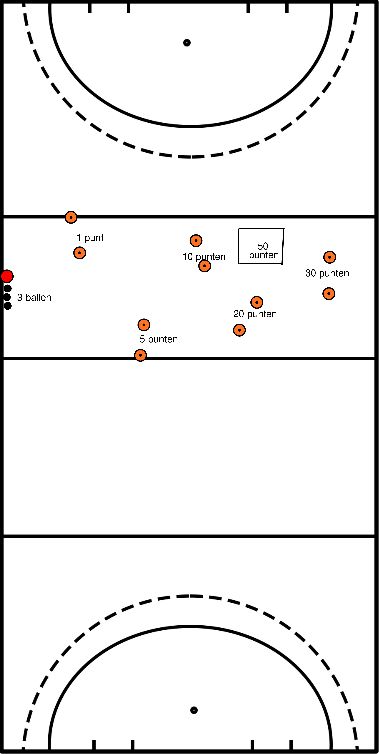
- Put out gates of pilons (2 meters wide). from sideline to sideline.
- Players get 3 balls on the sideline
- any ball they can pass through a gate
- In advance, the player indicates which gate he is going to play through
- Each gate has points, the further the gate the higher the points:
- 10 Meter gate = 1 point
- 15 meter gate =5 points
- 20 meter gate = 10 points
- 30 meter gate is =20 points
- 40 meter gate = 30 points
- See how many points each player scores, this makes it clear to the players that a long-distance pass is often not very accurate.
- In addition, you can show that pushing and flatting can be much more convenient than hitting.
- You can put (depending on the level) a square of 3M x3M on the field and if the players score and the ball lands in the square it is worth 50 points.
- Lay down a few streets and make sure everyone dribbles through the streets,
- make sure you've got enough streets so everyone doesn't have to wait for each other.
- (possibly give the order to drive through x streets, or as a train in a row.

- One street per 2 and passing in this street.
- increase / decrease the distance between each other
- Narrowing the street
- gradually narrow the street like a funnel


