


Volleyball drills
- Trainer throws-serves ball to passer.
- A passes ball to midfield position.
- B stands at the basket and catches the ball and brings it to the trainer and then joins the back of the line.
- A becomes B.
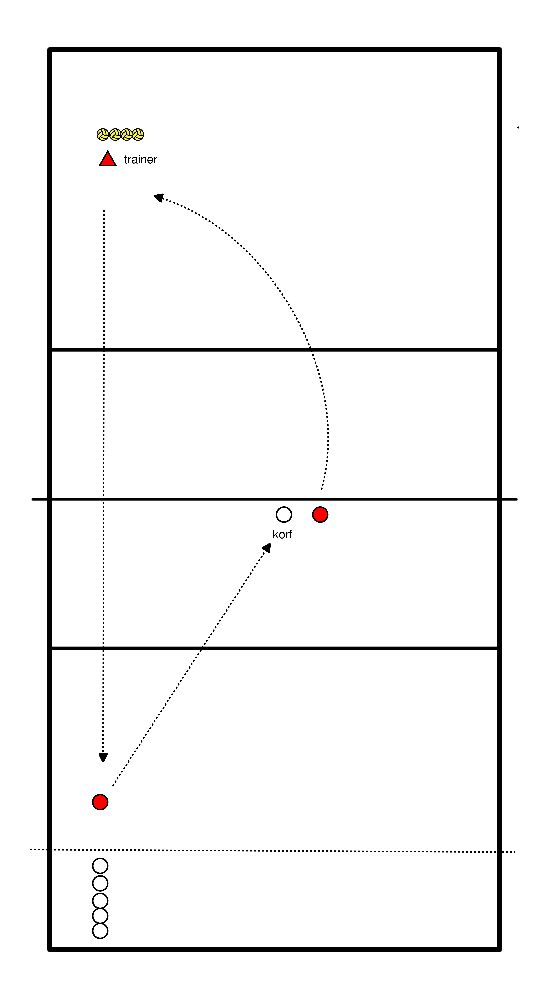
- This exercise trains the split step.
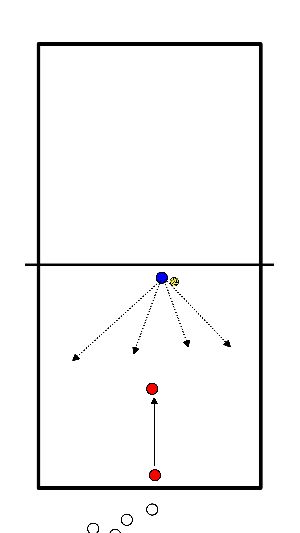
- Players line up behind the back line.
- Trainer or player stands at the net.
- One by one the players walk in from the back line.
- When the trainer hits the ball, the player makes a split step.
- Then he gets the ball on a random spot next to or in front of him.
- Player passes back and retrieves ball if necessary.
- After that the player closes in at the back.
- Make 3 team, per team 1 ball and 1 bench.
- Benches at equal distance (triangle with 3 teams).
- Teams try to score by bouncing the ball on an opponent's bench each time.
- 1 point each time. Never the same person in a row.
- The teammate defends the bench.
- Which team will have 10 points first?
- Variation:
- No running with the ball (i.e. throwing).
- Organization:
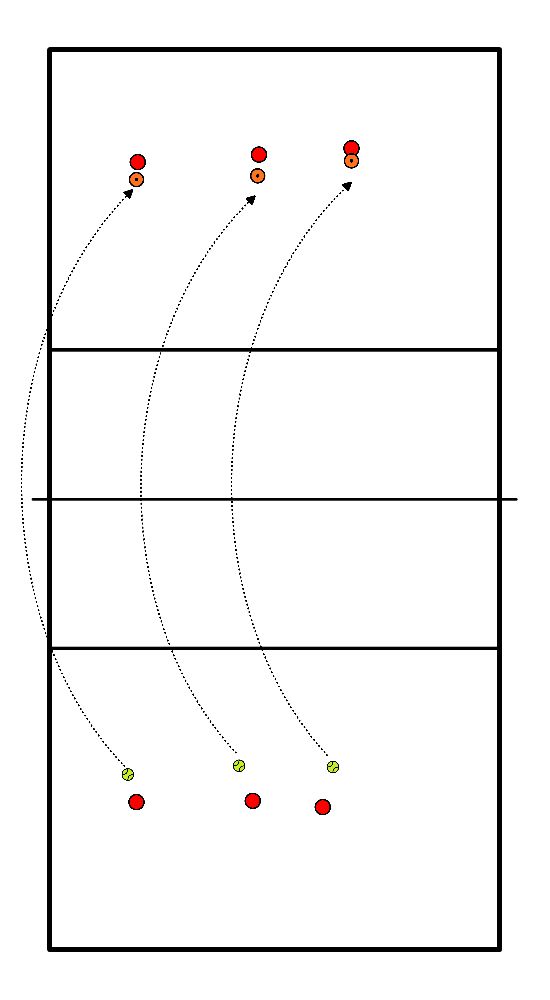
- Split group into trios with one hoop.
- They stand on field A at p1.
- Trainer with the balls on field B.
- Execution:
- Player hold the hoop together.
- Trainer hits ball.
- Trio must try to bounce the ball through the hoop.
- Retrieve ball and hand it in to Tr.
- Next trio.
- In addition to ball lane recognition, they learn to work together and communicate.
- Each player has a sit up ball - 9 different core-stability exercises
- The Grasshopper:
- To get the most benefit from this exercise, make sure your body is in a straight line from head to toe, your hips are square (parallel to the ground) and your abs are tucked in and braced.
- Your hips should not sink at all during the movement, especially when you return to full length from the knees inwards.
- Another important point is to make sure your shoulders fall over your hands at all times, so your body doesn't rock back and forth, largely losing the benefit of this stability ball exercise.
- If you have sensitive wrists, use a pair of dumbbells as a base for your hands, this will keep your wrists in a more neutral position and reduce their strain.
- Push ups:
- Keep your hands on the side of the ball so your wrists are more neutral and very slowly lower to the ball to make this a good challenge.
- Just before your torso hits the ball, explosively (yet controlled) push back up.
- Straight Leg Deadbug:
- To get the most out of this exercise, make sure your arms and legs are always pressed into the ball.
- Even if you extend one arm and leg to just above the ground, the leg and arm still holding the ball should be pressed into the ball.
- Back leg position:
- Place your arms to the side or under the lower back if more support is needed there.
- Start with your legs perpendicular to the ground and on either side of the ball.
- Then rotate your legs so that your right leg is in front of the ball (facing you), while your left leg is on the other side (facing away from you).
- Pause at the end of each turn and then turn again so that the legs are reversed.
- Hamstring Roll-Ins:
- The key is to keep your hips high the entire time, so that your body is in a straight diagonal line from your feet to your head.
- Dig your heels into the ball as you drag it back to your buttocks.
- Squeeze your hamstrings and return SLOWLY to your legs fully extended (remember to keep your hips up).
- Ball Sensitive Twists:
- Start with your hands on the ground, shoulders above your hands, abs braced, body in a straight line and feet on either side of the ball, activating your groins to keep your legs from slipping.
- This alone is a huge benefit.
- Next, slowly rotate your hips to the right so that your foot touches the ground.
- Use your obliques to pull your hips back square and then to the other side.
- Remember to keep your hips at shoulder height the entire time.
- Ball Planks:
- Here I want you to dig your forearms and especially your wrists into the ball.
- This alone will increase your core activation 10-fold.
- Tighten and brace your abs, keep your hips up, and glutes and quads contracted.
- Next, simply move the ball around in a small circular motion, moving only your arms.
- Your whole body should stay still like cemented concrete.
- Lateral Scratch Runs:
- The ball should be under your head and shoulders and feel like a pillow, while your arms are stretched out to the side and fully locked/contracted.
- As with all of these stability ball exercises, the key with this one is to make sure your hips are up and your body is in a straight line from your knees to your shoulders.
- Push-Ups:
- This is a pretty easy move as you go down and pull your knees towards your wrists.
- This, of course, also causes the ball to roll inward.
- But the real test begins when you push yourself out of this "tucked in" position. Try it and convince yourself.
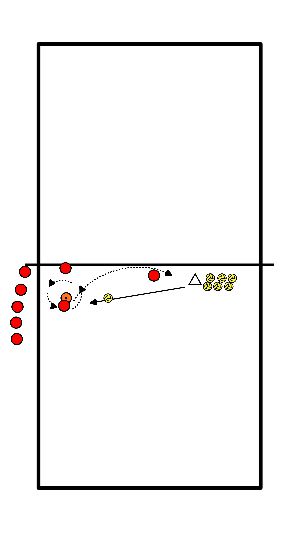
- The trainer stands in the middle near the net.
- One player stands in the field.
- The trainer throws the balls all over the field.
- The player is only done when he/she has touched/played three balls in a row.
- When the player misses the second or third ball the trainer starts the count again.
- Exercise to make several quick movements in a row and play high enough.
- Every child stands with the ball one meter from the net.
- Throw the ball over the net with a forearm movement and catch it on the other side.
- Throw the ball over the net with an overhead movement and catch it on the other side.
- Throwing the ball over the net overhead and catching it for yourself at the other side with forearms.
- If necessary, make it more difficult by varying height and distance.
- 2 teams.
- Per team one pawn and tennis ball.
- Player 1 catches the tennisball of player 2.
- Player stands still and in the right position while catching. (Hands in front of/above head, point of pawn towards nose.)
- 10x and then change.
- Players have a ball and dribble down the hall.
- On command, they throw the ball up and catch it.
- On command they throw the ball to a buddy.
- On command they throw the ball up and must pancake.
- On command they throw the ball in front of them and have to dive for the ball.
- For each command a different command. after the command they keep dribbling.
- You have 2 teams one is on one side of the field and the other on the other side.
- There is a ball played in the field the ball may fall on the ground 0/1 time the ball is passed by the teams to the other side of the field.
- If the ball either bounces 1/2 time, goes out or wrong technique a team has a point.
- Player starts with block jump at the net.
- Player then moves into position to defend a ball.
- Player passes the batted ball through the trainer to the catcher.
- Player shuffles around the pawn and defends the next ball.
- Catcher joins the line outside the field.
- Defender goes to catch.
- 4 benches, in pairs to the other side, next pair can as soon as the first bench is free.
- Each pair starts on the other side of the same bench.
- Walk across the bench, pass each other in the middle.
- Walk along the bench, jump in the middle and clap hands together, then the next bench.
- Everybody hops over the bench 4 times with hands on the bench. (move towards each other)
- Each a ball, walk over the bench, pass each other in the middle, while bouncing the ball.
- Bounce the ball, walk along the bench, jump in the middle and clap hands together.
- One ball in pairs, each on one side of the bench.
- Pass the ball while going from right to left (always closer to the middle and then further away again).
- Move sideways.
- Idem one side underarm return.
- Play one side overhead.