Volleyball drills
- This exercise trains the split step.
- Players line up behind the back line.
- Trainer or player stands at the net.
- One by one the players walk in from the back line.
- When the trainer hits the ball, the player makes a split step.
- Then he gets the ball on a random spot next to or in front of him.
- Player passes back and retrieves ball if necessary.
- After that the player closes in at the back.
- On both sides of the field 2 players come in.
- There is a pass, setup and attack (from 3 meter line).
- When side A has attacked, these two players circle off and two new ones come in.
- Side B defends the attack by the same pass-setup-attack, these players go to the back line and two new players enter.

- Organization:
- Divide group into trios.
- All on field A and trainer on field B.
- Implementation:
- 1st trio enters the field for a service pass.
- Trainer serves and the trio passes to p2/3 where one of the three catches the ball.
- Then comes trio 2, etc.
- Build out with setup and attack from position.
- Still later 1 trio is defending and we play out the rally.
- Organization:
- Split group into trios with one hoop.
- They stand on field A at p1.
- Trainer with the balls on field B.
- Execution:
- Player hold the hoop together.
- Trainer hits ball.
- Trio must try to bounce the ball through the hoop.
- Retrieve ball and hand it in to Tr.
- Next trio.
- In addition to ball lane recognition, they learn to work together and communicate.
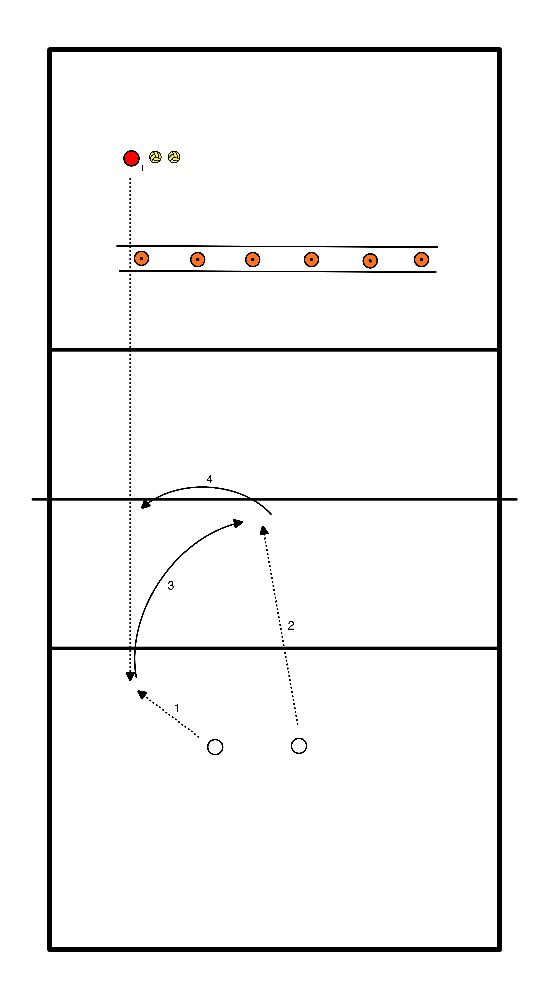
- Make 2 teams
- T (coach) throws ball to or serves on the straight.
- Action 1:
- Player runs in and passes
- Action 2:
- Player runs in and is ready for the set-up
- Action 3:
- Player gives a pass to position 3
- Action 4:
- Set-up at position 4
- Player tries to knock a pawn off the bench by smash.
- Pawn off the bench?
- Twosome gets 1 point.
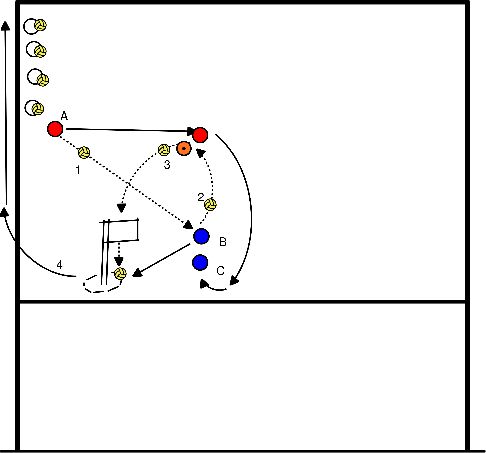
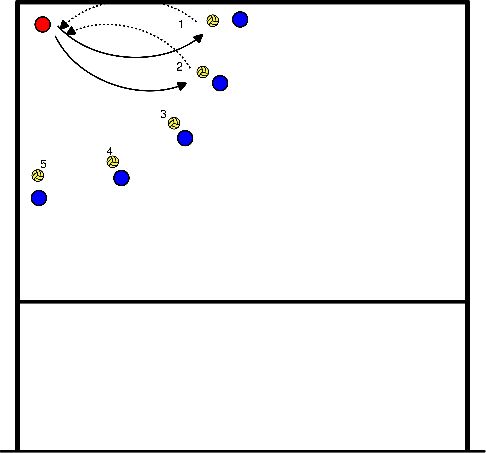
- Learning to pass to playmaker (position 2) with movement towards the ball.
- Line up at position 1.
- Players there have a ball in their hands.
- Player A plays to player B at position 3.
- Player A moves sideways to position 6.
- Player B plays the ball back to position 6.
- Player A plays the ball (preferably) BH to the korf basket at position 2.
- Player B catches the ball and joins the line at position 1.
- Player C moves into position player B.
- Player A moves to player C's position, position 3.
- On the other side of the net you can practice the same.
- Later on, alternate with player instead of basket, place of throw, position of return and position of pass.
- To learn to always pass to the distributor.
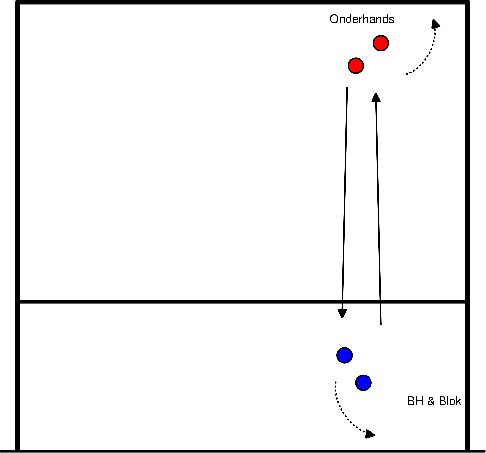
Combination of playing overhand, blocking and defending in teams of 4.
- At the net play 2x overhead, 1x for yourself and the next ball to the defense.
- Defense plays ball back underhand. (wide)
- After playing overhand block 2x at the net.

Combination of playing overhand, blocking and defending in teams of 4.
- At the net play 2 times overhead, 1 time for yourself and the next ball to the defense.
- Defense plays ball back underhand. (wide)
- After playing overhand block 2x at the net.
Extension of the exercise:
- Instead of playing the second ball overhead, hit it in a targeted way.
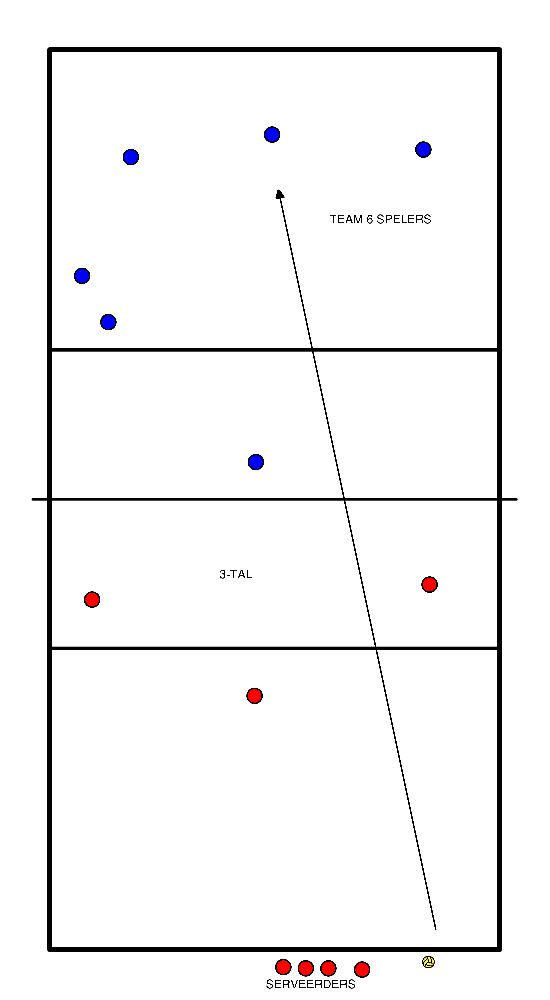
- On one side of the field there is a six in full formation.
- On the other side are 3 players.
- Behind the 3 players stand the servers.
- Exercise:
- Servers serve the ball, the 6 team defends this ball and plays out the rally.
- The 3-man team may defend and also rally.
- Point count:
- Service error, 1 point for the team that was set up.
- Ball on ground by the 3 team, point for the essayed team.
- Good service, but rally won by 3-player, point for 3-player.
- IF 3-TAL has 3 points three move on, if TEAM has 12 points, 3-tal and all servers must push up 5x.
- This exercise can be done in 3 or 4 teams.
- Minimum number of players is 6 and maximum 8 per available field.
- In a 4-player team, two players on each side of the net.
- Use during the exercise half a net width per 3-4 team.
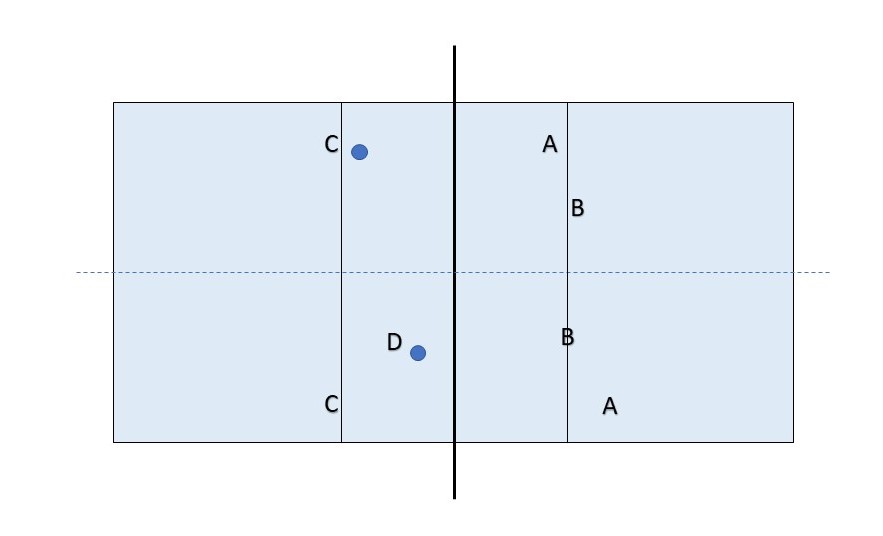
- In a 4-player team:
- 2 players on each side.
- The ball is thrown over the net at the start.
- Player A plays the ball for himself and at the 2nd contact he gives a set-up for player B.
- Player B tips the ball over the net with 1 hand.
- Player C plays the ball for himself and then gives a set-up for player D.
- D tips the ball over the net.
- After a team has played the ball over the net the players change places.
- In the case of a 3-player team:
- 2 players on one side of the net and the other player only on the other side.
- Player C has the ball and throws it over the net to the 2 team.
- Player A plays the ball for himself and at the 2nd contact he gives a set-up for player B.
- Immediately after giving the set-up, player A goes under the net.
- Player B tips the ball over the net with one hand.
- Player C plays the ball for himself and gives a set-up for player A.
- Player C goes to the other side of the net immediately after giving player A a set-up.
- Player A tips the ball over the net to player B.
- Player B plays the ball for himself and gives a set-up for player A.
- After giving the set-up player B goes under the net.
- Expansion:
- Possible mandatory blocking of tip ball by player not doing the passing.
- Possible mandatory blocking of tip ball by player not doing the passing.
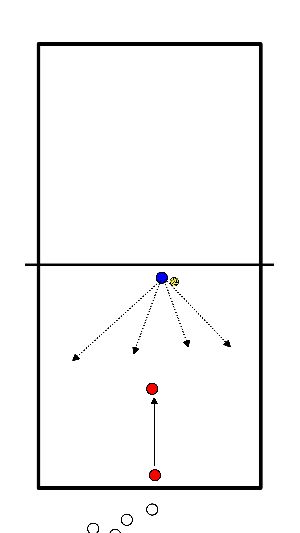
- Objective:
- Increase responsiveness.
- Place one player in the corner of the field.
- Have at least 4 players stand around him in a quarter circle.
- Each player has his own ball.
- Throw the ball in tempo (tight) on the knees of the player in the corner to pass back underhand.
- After passing, immediately throw the ball to the next player in the quarter circle.
- Player in the corner so consecutive balls in underhand pass back:
- Important to stay low.
- Expect the ball.
- Respond regardless.
- About 5 rounds and then replace the player in the corner.
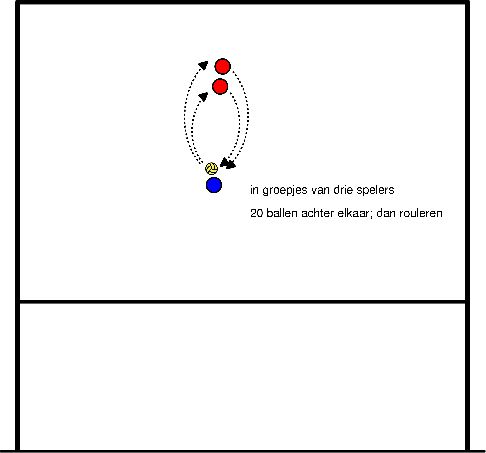
- Two players stand behind each other.
- About half a meter apart, facing the same way.
- Another player stands 3 or 4 meters away from them and has a ball and throws it to upper hand.
- The one who throws throws randomly on player 1 and 2.
- Player 1 or 2 calls loose if he thinks the ball is for him and plays overhand back.
- About 20 balls in a row.
- Then the group of 3 changes position until everyone has been there.
- After that again, but now without talking.